
Settings needed for an Email Account in Outlook Express
 To ensure that Outlook Express will be able to connect to your email account, check the email account settings below, needed to set up new email accounts in Outlook Express.
 Standard email account settings are: user name and password, email address (sometimes used as user name as well), “port” numbers (nearly always the ones we use in the sample email account below).
Although rarely, some email providers require “secure authentication”: Outlook Express would then use a secure (encrypted) connection to authenticate itself to the email server.
1. Setting up an Email Account in Outlook Express
 The new email account wizard will automatically open the first time you run Outlook Express. It is however possible to setup a new or additional email account in Outlook Express after the fact.
To manually setup or add an email account in Outlook Express, go to the Tools menu, and click Accounts to access existing email and news accounts, from where you can add email accounts.
If the new email account wizard opens automatically, simply proceed with the new email account setup below.
 The Internet Accounts dialog will open, and display all accounts (email and other) you currently have setup in Outlook Express.
By default, you should have four “directory services” listed under “All” – these are not related to your email accounts.
(If you already had email accounts setup in Outlook Express, they would be listed both under the All and the Mail tab.)
The Internet Accounts dialog is the central location from which you can add, remove, or modify email accounts, as well as import or export email accounts in Outlook Express.
2. Creating or Adding a New Email Account in Outlook Express
 To create and setup a new email account in Outlook Express, click the Add button with an arrow, and choose Mail.
The email account setup wizard will now lead you through the email account setup process.
 The Internet Connection Wizard will open. This wizard will guide you through all the steps needed to setup an email account in Outlook Express.
The first field is the Display Name: type in it your name, as you would like it to appear to recipients when you send emails from Outlook Express. This information can be changed later on, after you have finished setting up your email account.
Click the Next button to proceed with the creation of your new email account.
 The wizard’s second screen, Internet E-mail Address, allows you to enter your actual account’s email address.
Your email address, as it should be entered, is composed of two parts: the “user name”, which is the part that comes before the “@” sign, and the “domain name”, which is the part that comes after the “@”, like yahoo.com, hotmail.com, aol.com, etc.
Your email address will also be used by Outlook Express as your email account’s user name, but this can be changed later, from the email account properties. (Outlook Express automatically uses your email address as user name because most email providers follow this convention.) — Click Next to configure your email account’s mail servers.
3. Setting up a POP3 Email Account in Outlook Express
 In the E-mail Server Names, Outlook Express collects the incoming and outgoing email server names, and the type of email account you try to setup.
mail.emailDomain.com is the most common form of mail server name, where emailDomain.com is your email provider’s domain.
In most cases, these will contain your email domain name. In some cases, your email provider may ask you to use an “IP Address”, which Outlook Express will also accept.
The most frequent type of email account is POP3
In most cases, your incoming and outgoing mail servers are mail.email.com, where email.com is your email account’s domain name (the part that comes after the “@”), that Outlook Express will use to “talk” with the email server.
Show a technical digression, or Click the Outlook Express Email Account Setup Wizard’s Next button.
 The Internet Mail Logon is Outlook Express’ last screen in the creation of a new email account.
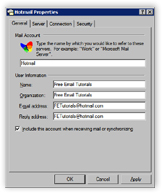
In the Account Name field, Outlook Express lets you give a friendly name to the email account you have just setup. “Work Email” or “My Email” would be examples. Outlook Express will display this email account name, and use it whenever it refers to it.
In the Password field, Outlook Express is requesting the password needed to access your email account. Outlook Express can optionally remember your email account password for you. This will spare you from having to type it whenever Outlook Express checks for new emails on the server.
By default, Outlook Express will use your email server name as “friendly” name for the email account you just set up.
 Congratulation – you have setup an email account in Outlook Express.
Click the Finish button, and you will return to Outlook Express’ Internet Accounts dialog, from which you created your email account in the first place.
Click the Properties button to tweak your new email account’s settings.
4. Configuring New Email Accounts in Outlook Express
You have just created a new email account in Outlook Express. The email account settings you provided during the email account setup are nearly always enough for Outlook Express to connect to your email account.