Calendar pop-up link position / not showing in Joomla

I Had an issue in IE7, IE8, IE9, IE10 when I click on the calendar icon the calendar does not appear. I then scrolled to the top of the page and there it was.

So the issue in Joomla to view the pop-up calendar when you click on the icon is to edit  media/system/js/calendar.js file

Replace:

if(Calendar.is_ie){br.y+=document.body.scrollTop;br.x+=document.body.scrollLeft;}else{br.y+=window.scrollY;br.x+=window.scrollX;}

with:

if(Calendar.is_ie){br.y+=document.body.document.documentElement.scrollTop;br.x+=document.body.document.documentElement.scrollLeft;}

Now my calendar icon links work in IE7, IE8, IE9 and IE10

Share
Posted in CSS, Internet Explorer, Internet Explorer, Joombah jobsboard, Joomla | Tagged , , , , , , | Leave a comment

Grant access to your webserver via a router

I wanted to give access to my web server from outside my network. I already have WAMP server setup on my server.

I followed the below information and it worked pefectly…first time!

How to set up port forwarding to an internal web server

There have been many users stating incorrectly that port forwarding doesn’t work on the Sky router, so I decided to write a click-by-click guide on how to set up port forwarding to allow a web server that is running on the internal network to be accessible from the Internet. This guide does not explain how to set up the web server – it assumes that you already know how to do this. The whole lot takes about 30 seconds (well, testing adds a few minutes more). I’d like to thank isu for trying out these instructions to prove that, yes, it really does work after all.

Beware: when publishing an internal web server to the Internet, the bandwidth that users will experience will be limited to the upload, not download, speed. Also, you might want to ensure that you don’t fall foul of the fair usage policy by running a high-usage web site!

A few assumptions to start with:

1. The only Internet connection you have is via the Sky router. If you have, for example, multiple Internet connections, or some clever internal routing between routers, then your port forwarding may not (probably won’t) work.
2. The router is fresh out of the box or has been reset back to factory defaults. In addition, it is running the Sky firmware.
3. The internal IP address of the web server is 192.168.0.2 and your router is 192.168.0.1.
The web server is not using host headers (that is, it can be accessed via its IP address). If this assumption is meaningless to you, worry not: we’ll test this in the first stage anyway!
4. The web server is using the default HTTP port: TCP port 80.
5. There are no local firewalls (including Windows firewall) running on the web server. If there is: stop it! It can be switched back on later, but for now, let’s just get it working without the server’s firewall.

Note: The instructions work with or without uPNP. Also, it is for web servers only. (OK, it can be adapted for any TCP or UDP port, but I’m strictly sticking to a web server in this guide lest it becomes over-complicated.)

Here goes…

1 Check that the web server is accessible internally by pointing a browser at it’s internal (NOT external) address: http://192.168.0.2. If that doesn’t work, fix the web server before continuing.
2. Log into the web interface of the firewall (the “admin”, “sky” one).
3. On the main page, under the “ADSL Port” section, make a note of the “IP Address”. You’ll need this later for testing.
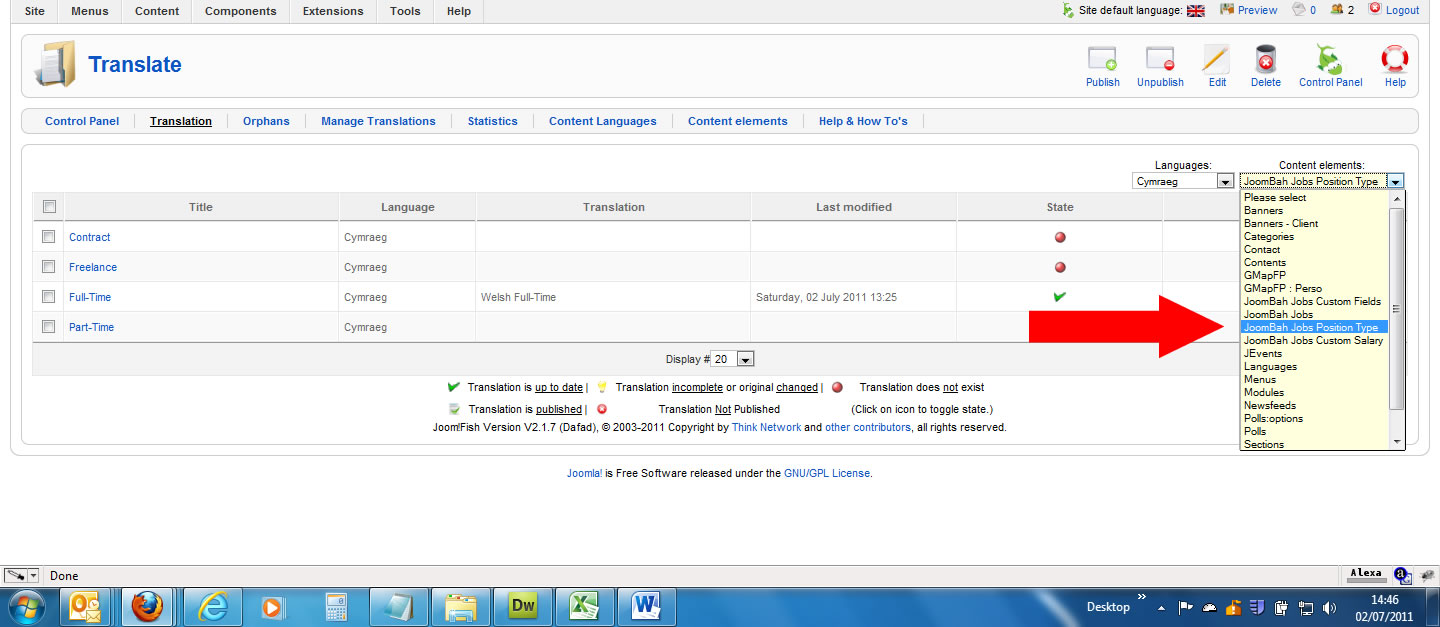
4. Click “Firewall Rules” on the left.
5. Under “Inbound Services” click the “Add” button.
6. Change the Service to “HTTP(TCP:80)”.
7. Leave the action as “ALLOW always”.
8. In “Send to LAN Server” enter the IP address of the web server: 192.168.0.2, using the tab key (not the full stop) to move between each part of the IP address.
9. Leave all the other fields as they are.
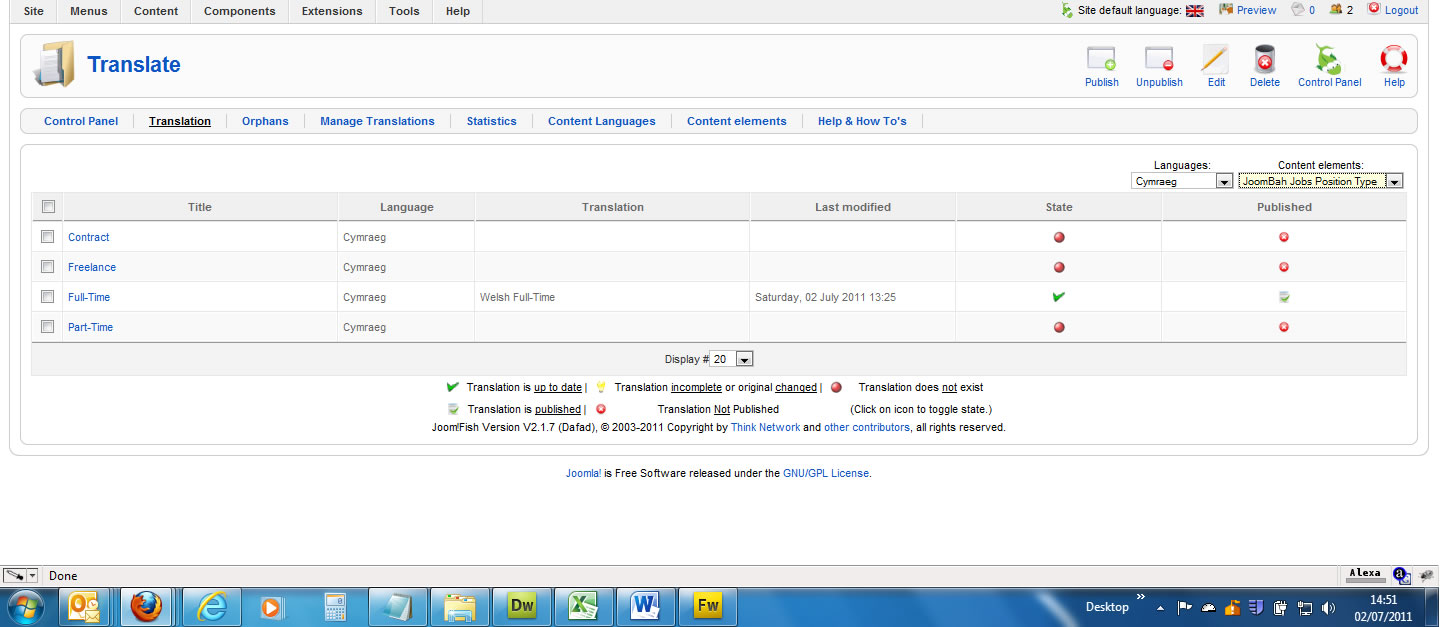
10. Click the “Apply” button.
11. On the next screen, click the “Apply” button (the one next to the “Cancel” button).

Testing that it works…

On a PC that is on the Internet (i.e. NOT one on the same network as the web server) such as at an Internet cafe, fire up a web browser and point it to the public IP address of your Internet connection. This is the IP address that you made a note of in stage 3 above. For example, if the address you made a note of is 199.1.2.3, from the Internet cafe, you’d enter http://199.1.2.3 into the web browser.

If you’ve followed the instruction to the letter, the web page should appear and you have port forwarding working.

All that remains is:

Switch the firewall on the server back on (assuming there was one in the first place and you still want to run it). Test again. If it breaks, fix the web server’s firewall.

Get the router’s WAN IP address into a dynamic DNS service such as Dynamic Network Services, Inc. — DynDNS — Welcome. The “how to” do this is outside the scope of this guide.

Link to the original post is:

http://www.skyuser.co.uk/forum/sky-broadband-tutorial-section/10975-how-set-up-port-forwarding-internal-web-server.html#post63601

Share
Posted in Broadband, Sky, wamp server, Website Hosting | Tagged , , , , , , , , | 1 Comment

Using Windows 7’s Windows XP Mode to Run Multiple Versions of Internet Explorer

This document contains step-by-step instructions for setting up multiple copies of Windows XP Mode on a Windows 7 PC in order to run Internet Explorer 6, 7, and 8 simultaneously with IE9 in Windows 7. Windows XP Mode is available on Windows 7 Professional, Enterprise, and Ultimate editions.

These instructions assume a moderate degree of experience working with your PC and are provided “as-is” for developers comfortable performing its steps.

Installing Windows XP Mode

  1. Configure your PC’s BIOS for Hardware-Assisted Virtualization (HAV) by following the instructions here. HAV is not required but XP Mode will run much better if hardware-assisted virtualization can be enabled.
  2. Navigate to the Download Windows XP Mode page. Choose your Windows 7 edition and language and then download, save, and run Windows XP Mode setup. Depending on the speed of your Internet connection, this can take up to an hour.
  3. Return to the Download Windows XP Mode page, if needed choose your Windows 7 edition and language again, then download, save, and run Windows Virtual PC setup. You will need to restart your PC after this installation.
  4. After restart, click the Windows 7 Start button, select All Programs > Windows Virtual PC > Windows XP Mode to begin first-time setup of the Windows XP Mode virtual machine. When first-time setup completes, you’ll find yourself in an XP Mode window with IE6 pre-installed.
  5. Install an anti-virus program in the XP Mode virtual machine. Microsoft Security Essentials is free and works well with Windows XP Mode.
  6. Install all the important and high priority updates except IE7 or IE8 using the Custom option of Window Update (this assumes you want this first virtual machine to stay with IE6). Since Windows Update will keep pushing either IE7 or IE8 on you, you should open each of these and choose “Don’t show this update again.”
  7. Install any other software or utilities that you want available in the XP Mode virtual machine.

Once you’ve configured this first virtual machine, you can move onto copying it to create two more: one for IE7 and one for IE8. To do that, close all open applications then close your Windows XP Mode virtual machine. By default, the virtual machine will hibernate but that seems to be okay for the following steps.

Create a Second XP Mode Virtual Machine for IE7

Creating a second XP Mode virtual machine for IE7 is easier than setting up the first though the steps below are longer because they’re more complete. Briefly, all you need to do is copy the virtual hard disk file, create a new virtual machine using that hard disk file, rename the virtual computer, and use Windows Update to install IE7. Here are the steps in more detail:

  1. Go to the folder where the virtual hard disk files are stored. These will be in the \AppData\Local\Microsoft\Windows Virtual PC\Virtual Machines folder under your user account. To find this folder:
    • Use Windows 7 Start menu to open your root user folder (the user name link at the top of the right column of the Start menu)
    • If you don’t see AppData in the list of folders, you need to turn on viewing hidden files and folders:
      • Press the Alt key to display Windows Explorer’s menu
      • Choose Folder options… from the Tools menu
      • Select the View tab
      • Click the radio button for “Show hidden files, folders, and drives”
      • Click OK
    • Double-click the AppData folder, the Local folder, the Microsoft folder, the Windows Virtual PC folder, and, finally, the Virtual Machines folder. Here you should see three files all with the root name “Windows XP Mode”.
  2. Select Windows XP Mode file with the type Virtual Machine Hard Drive Image (.vhd extension if you’re showing extensions). Press Ctrl-C to copy the file and then Ctrl-V to paste a copy of it. Copying the file may take a few minutes.
  3. Select the file named “Windows XP Mode – Copy”, press F2 to rename the file, and change the word “Copy” to “IE7”. The resulting name should be “Windows XP Mode – IE7” (the actual name is not important; this is just the convention I’ve used).
  4. Now navigate back to your top-level user folder and open the Virtual Machines folder.
  5. Click “Create virtual machine” on the command bar. This starts a multi-step wizard to create a new virtual machine.
  6. Name the machine “Windows XP Mode – IE7” and click Next and then Next again on the second screen.
  7. On the third screen, choose “Use an existing virtual hard disk”, then browse down to the \AppData\Local\Microsoft\Windows Virtual PC\Virtual Machines folder under your user account and select the “Windows XP Mode – IE7” virtual machine hard drive image file you created in step 3 above. Click Create.
  8. Double-click your newly-created “Windows XP Mode – IE7” virtual machine. Log on using the password you used when you created the original Windows XP Mode machine.
  9. Rename this “computer” so that it won’t conflict on the network if you run two virtual machines at the same time. In the running XP Mode virtual machine:
    • Click Start > My Computer
    • In the System Tasks panel, click View system information
    • Click the Computer Name tab
    • Click Change… to rename the computer
    • Change the computer name as you wish; I just change the last digit of the generated name
    • When prompted, restart the virtual machine to make this change
  10. Start Windows Update and choose Custom. You should see something like this:
  11. It’s somewhat tricky to get Windows Update to offer you IE7 because IE8 supersedes it. This sequence worked for me:
    • In the message box above, click “Restore them now”
    • Check Internet Explorer 8 for Windows XP and click “Restore and Check Again”
    • You’ll again see the “You’ve hidden important updates” message box. Click “Restore them now”
    • Check Internet Explorer 7 for Windows XP and click “Restore and Check Again”
    • You’ll now see only Internet Explorer 8 for Windows XP because IE8 supersedes IE7 but there’ll be no message about hidden updates. Uncheck “Internet Explorer 8 for Windows XP” and click “Don’t show this update again”
    • Close Windows Update, restart it from the Start menu, and choose Custom
    • You’ll once again see the hidden update message but you should also have one High Priority update: Internet Explorer 7 for Windows XP
    • Ensure IE7 is checked, click “Review and install updates,” and then “Install Updates”. This will take a while and restart your XP Mode virtual machine
  12. After installing IE7, run Windows Update from the Start menu, choose Custom, and install the IE7 security updates. Windows Update will still tell you “You’ve hidden important updates.” That’s IE8, which we’ll install in a moment in a third XP Mode virtual machine
  13. Shut down this virtual machine by selecting Close… from the Action menu and choosing Shut down in the drop down list

Create a Third XP Mode Virtual Machine for IE8

Creating a third XP Mode virtual machine for IE8 is even easier as we’ll start with the IE7 virtual machine hard disk image. The steps below assume you just completed the previous sequence and don’t repeat all the specific details.

  1. Go to the folder where the virtual hard disk files are stored (the \AppData\Local\Microsoft\Windows Virtual PC\Virtual Machines folder under your user account), make a copy of the “Windows XP Mode – IE7” virtual hard disk image, and rename it “Windows XP Mode – IE8”
  2. Go to the Virtual Machines folder directly under your root user folder
  3. Click “Create virtual machine” on the command bar
  4. Name the new virtual machine “Windows XP Mode – IE8”, click Next, and Next again
  5. On the third panel of the wizard, select “Use an existing virtual hard disk”, browse to the folder containing the IE8 virtual hard disk file from step 1, choose the file “Windows XP Mode – IE8”, and click Create
  6. Double-click the newly created “Windows XP Mode – IE8” virtual machine
  7. Sign on to the machine as “xpmuser” with the password you provided when you created the first XP Mode virtual machine
  8. Follow the steps in item 9, above, to rename this new virtual computer
  9. Run Windows Update from the Start menu and choose Custom
  10. Click “Restore them now” in the “You’ve hidden important updates” message box, check Internet Explorer 8, and click “Restore and Check Again”
  11. Under High-priority Updates, ensure that Internet Explorer 8 is checked, click “Review and install updates”, click “Install Updates”, and then reply to the various prompts as IE8 installs
  12. Run Windows Update / Custom and install the offered security updates

Success

The process outlined above took me about 2-3 hours to complete with interruptions. When finished, I could run the three Windows XP Mode virtual machines simultaneously and access the Internet from each.


One thing I’ve noticed is that the two copies of the original XP Mode virtual machine do not auto-logon like the first. There also appear to be other domain security-related issues but nothing that stopped me from using these additional XP Mode virtual machines to test old versions of IE against Internet content. If the host PC is part of a corporate domain, you may want to join your XP Mode virtual machine to that domain and add your domain account as a local user on the XP Mode virtual machine.

If you care mostly about just one previous version of IE, updating the base Windows XP Mode virtual machine to that version may be a bit smoother than the procedure I’ve outlined here.

—Ted Johnson, Microsoft Internet Explorer Team


Share
Posted in Internet Explorer, Microsoft Windows | Tagged , , , , , , , | 1 Comment

Joombah jobsboard joomfish translation

Hi

I have a dual language site using Joomfish. I wanted to translate the fields that are kept in the back end. I presume it will work for any of these fields that are stored in the backend / database.

In my case for example I wanted to translate “Position Type”

In order to do this I created an XML file (jgbobs_pos_type.xml) in: \administrator\components\com_joomfish\contentelements

The code inside the xml file is as follows:

Save it as: jbjobs_pos_type.xml

<?xml version="1.0" ?>
<joomfish type="contentelement">
<name>JoomBah Jobs Position Type</name>
<author>JoomBah Team</author>
<version>1.0</version>
<description>Definition for JoomBah Jobs description</description>
<copyright>JoomBah.com(C) 2010 - 2011, All rights reserved.</copyright>
<reference type="content">
<table name="jbjobs_pos_type">
<field type="referenceid" name="id" translate="0">ID</field>
<field type="titletext" name="pos_type"  length="50" maxlength="100" translate="1">Position Type</field>
</table>
</reference>
</joomfish>

All you have to be concerned with from the above example is:

1. The table name you are trying to translate:
<table name=”[b]jbjobs_pos_type[/b]“>

2. The field name in the table you want to translate <field type=”titletext” [b]name=”pos_type”[/b]  length=”50″ maxlength=”100″ translate=”1″>Position Type</field>

Save / upload the file as I mentioned above.

Now. If you go to Joomfish > Translate > And choose the drop down on the right “Content Elements” you will see “JoomBah Jobs Position Type”.

Select it and make the translation and you are done.

Don’t make the mistake which I made and go to front end and think the text would have changed…You have to go to the job and edit it in your language. You will see that the field options have changed.

You can do this for all the variations

The Joombah team might have a better solution, but this worked for me.

Hope this helps.

Share
Posted in Joombah jobsboard, Joomfish, Joomla | Tagged , , , , | Leave a comment

Back up email in Microsoft Outlook

Most people don’t realize that email isn’t necessarily saved in backups the same way that other files are. That’s because Outlook saves your emails in a Personal Folder file with a .pst extension that doesn’t automatically get caught in normal backups. Unless you’re using a Microsoft Exchange Server email account or a third-party HTTP account (like Windows Live Hotmail), you’ll need to perform a few extra steps to make sure Outlook emails aren’t lost forever if your computer goes belly up.

.Pst files can be quite large, so it’s a good idea to make sure your backup location has plenty of room—and that you allow lots of time for an email backup to occur. After you’ve done that, just follow these steps to back up your Outlook content:

  1. Open Outlook.
  2. In Outlook 2010:
    Click the File tab, and in Backstage view, click Open, and then click Import.File tab in Outlook 2010, with Open options listed
  3. In Outlook 2007:
    Click File, and then click Import and Export.
  4. In the Choose an action to perform list, click Export to a File, and then click Next.
  5. In the Create a file of type list, click Outlook Data File (.pst) in Outlook 2010 or Personal Folder (.pst) in Outlook 2007, and then click Next.
    Picture of Export to a File dialog box, with Personal Folder Files (.pst) selected.
  6. In the Select the folder to export from list, click the folder you want to export from, such as Inbox or Sent Items, and then click Next.
  7. Browse to and select the location where you want to save the file. Remember, backups should be placed somewhere other than the original location of the source file. For example, if your source file is on your computer’s hard drive, you’ll want to save your backup file to an external source, like a CD or an external hard drive.
  8. Choose the default setting Replace Duplicates with Items Exported.
  9. Click Finish.
  10. At any time, you can restore your file by importing it into Outlook.Note: If you want to just view or access something in your exported .pst file without importing it back into Outlook, you can simply open the .pst file.In Outlook 2010:
    Click the File tab and, in Backstage view, click Open, and then click Open Outlook Data File.In Outlook 2007:
    Click File, point to Open, and then click Outlook Data File.

In closing
See how quick and easy it is to protect yourself and your data from permanent loss? Backing up your data might take you a couple of extra minutes a few times a month, but you’ll be glad you took that time if an emergency ever happens.

Article by: http://www.microsoft.com/athome/setup/backupdata.aspx

  1. In the Select the folder to export from list, click the folder you want to export from, such as Inbox or Sent Items, and then click Next.
  2. Browse to and select the location where you want to save the file. Remember, backups should be placed somewhere other than the original location of the source file. For example, if your source file is on your computer’s hard drive, you’ll want to save your backup file to an external source, like a CD or an external hard drive.
  3. Choose the default setting Replace Duplicates with Items Exported.
  4. Click Finish.
  5. At any time, you can restore your file by importing it into Outlook.Note: If you want to just view or access something in your exported .pst file without importing it back into Outlook, you can simply open the .pst file.In Outlook 2010:
    Click the File tab and, in Backstage view, click Open, and then click Open Outlook Data File

    In Outlook 2007:
    Click File, point to Open, and then click Outlook Data File.


In closing
See how quick and easy it is to protect yourself and your data from permanent loss? Backing up your data might take you a couple of extra minutes a few times a month, but you’ll be glad you took that time if an emergency ever happens.

Share
Posted in Microsoft Windows, Outlook | Leave a comment

Joomla: Edit login module

If you want to edit the joomla log-in module you can go to and edit: /modules/mod_login/tmpl/default.php

In my case I wanted to remove the option to register (without disabling the ability to register from Global configuration.

Remove or comment the following:

<!-- remove below to remove the register now option -->

<!–<li>

<a href=”<?php echo JRoute::_( ‘index.php?option=com_user&view=register’ ); ?>”>

<?php echo JText::_(‘REGISTER’); ?></a>

</li> –>

Share
Posted in Joomla | Leave a comment

Joombah Jobs Board – Allow HTML and CSS Tags in Tooltips

Joombah is an excellent component for joomla 1.5 and 1.6.

I wanted to be able to add HTML and CSS Tags to my tooltips to format the tooltips as I wanted.

All you have to do is:

1. Open /administrator/components/com_jbjobs/controllers/jbjobs.php
2. Find $parent = ($post['type'] == 'group')? 0 : $post['parent'];
3. Add this below the above line:
$post['tips'] = JRequest::getVar('tips', '', 'post', 'string', JREQUEST_ALLOWRAW);

Thanks to the advice from Joombah

Share
Posted in Uncategorized | 3 Comments

Joombah Jobs Board Component for Joomla 1.5 and Joomla 1.6

JobSeekers’ Features

Front-End

JBJobs has all the necessary features to run a successful Human Resource database directly onto our System by using our component. Below are only some feature highlights of JBJobs If you don’t see a feature you are looking for, feel free to Contact Joombah.

To see JBJobs Online Demo and Demo for Joomla 1.6.


For Job Seekers

  • Dashboard for job seeker
  • Jobseekers can get periodic Job Alerts
  • Jobseekers can keep track of Recruiters viewing his/her profile
  • Ajax style checking registration with help messages
  • Job listing by categories, by industry, by location and positions
  • Search jobs by title, category, job type, job status, salary range, highest education, shift, experience, duration, publishing date, company and location
  • View all jobs posted by a company
  • CV manager (CV form, upload CV, CV editor, image upload)
  • Allow multiple CV’s and cover letters
  • View my applied jobs
  • Job seeker can interact withr employer through the Private Messaging System

More features to come later. Plus extra modules and plugins to feature-compliment the component.


Employers’ Features

Front-End

JBJobs has all the necessary features to run a successful Human Resource database directly onto our System by using our component. Below are only some feature highlights of JBJobs If you don’t see a feature you are looking for, feel free to Contact Joombah.

To see JBJobs Online Demo and Demo for Joomla 1.6.

For Employers

  • Dashboard for employer
  • Employers can sign-up using membership plans without any third-party components.
  • Employers can generate invoices.
  • Ajax style checking registration with help messages
  • Save time with flexible and powerful resume search interface
  • Search resumes by application title, name, nationality, gender, availability, category, job type, salary range, education, experience
  • Build companies profile
  • Upload a company logo
  • Add, edit and delete jobs
  • Send email to employer when job seeker apply to a job
  • Professional display of job searches and resumes
  • View job applied resumes with number of applied resume
  • Employer can interact with job seeker through the Private Messaging System

More features to come later. Plus extra modules and plugins to feature-compliment the component.


Administrator Features

Front-End

JBJobs has all the necessary features to run a successful Human Resource database directly onto our System by using our component. Below are only some feature highlights of JBJobs If you don’t see a feature you are looking for, feel free to Contact Joombah.

To see JBJobs Online Demo and Demo for Joomla 1.6.

Administrator Console

  • Administrator dashboard
  • Manage Jobs Alerts
  • Manage job types and status
  • Manage Subscriptions
    • Add, edit and delete Subscriptions
    • Manage Custom fields
    • Add, edit, delete custom user fields
    • User fields are six types (text field, check box, date, drop down, email and text area)
    • Change field ordering and published/unpublished fields
  • Manage jobs
    • Add, edit and delete jobs
    • Add, edit, delete custom job fields
    • User fields are six types (text field, check box, date, drop down, email and text area)
    • Change field ordering and published/unpublished fields
  • Manage CVs
    • Edit and delete CVs
    • Change field ordering and published/unpublished fields
  • Manage job categories
    Manage salary types
    Manage roles 

    • Add, edit and delete roles
    • Employer role values are companies allowed, jobs allowed and published
    • Job seeker role values are resume allowed and published
  • Manage countries-states-cities
    • Add, edit, load and delete countries-states-cities
  • Manage universities. study of major and degree settings
    Manage configuration 

    • Private messaging settings
    • Site settings are title, default country, allow user to register as a employer, company auto approve, job auto approve, resume auto approve, show editor in job form and currency
    • Search job setting are show job experience, specialization and category
    • Search resume settings are allow save search, show title, show name, show gender, show available, show experience, show highest education, show salary range and show nationality
    • Job listing filter settings are show filter, show address, show category, show job type, show highest education and show salary range
  • Manage billing transactions
    • Remove or approve transactions
  • Manage Payment settings
    • Set PayPal account id, in case of payment through PayPal
    • Set Bank Name, Account Name and Number, in case of payment through Manual Transfer
    • Set the payment notification, how to send the proof of payment.

More features to come later. Plus extra modules and plugins to feature-compliment the component.

Share
Posted in Joombah jobsboard, Joomla | Tagged , , , | 2 Comments

Joombah: Set salary to accept more characters and text

In Joombah you can set the salary for a job to say:

Salary: 1000,00 per month

I needed to say:

Salary: 1000,00-2000,00 per month

This is how I did it:

1. I changed components/com_jbjobs/views/employer/tmpl/editjob.php from:

<input class="inputbox required" type="text" name="salary" id="salary" size="10" maxlength="10" value="row->salary; ?>" />

to:

<input class="inputbox required" type="text" name="salary" id="salary" size="15" maxlength="30" value="row->salary; ?>" />

2. I then changed the database field jos_jbjobs_job from “float” to “varchar”

This will allow you to add more caracters in the approximate salarey field and save it into the databse.

You now need to show the results on the guest jobs page.

Go to > components/com_jbjobs/views/guest/tmpl/detailjob.php

And replace:

$salary = $job->currency_salary.' '.number_format($job->salary,2,'.',',').' / '.$job->type_salary;

with:

$salary = $job->currency_salary.' '.$job->salary.' / '.$job->type_salary;

Save and upload.

Result =

Share
Posted in Joombah jobsboard, Joomla | Leave a comment

Joombah: Allow the employer to set the expiry date from the front end?

Go to Joomla Backend > Components > Joombah > Dashboard > Global Configuration > Components Settings > Set “Free Mode” > NO > Save

Go to Membership plans (Left menu) > Un-publish all the plans except the “Free Membership” > Click on “Free Membership” > Set “Duration” (10 Years) > Bonus Credits:0 > Credits per job:0 > Credits per Featured job:0 > Credits per Resume view:0 > Price of 1 Credit:0 > Job expires (Max. days):365 > Credit expire after grace period? NO > Save

Now, when you create a job as an employer when you save the job you will be directed to a new page where you can set the start and end date.

Share
Posted in Joombah jobsboard, Joomla | Tagged , , | Leave a comment